Friday, December 23, 2011

Hi All,

     Hope everyone is ready for Christmas.  It's gonna be a quiet one at my house.  Breakfast, Christmas play, and service at church.  Then home to watch Christmas shows on tv.  Will also be doing some Kumihimo, trying new designs and working to get better on my marudai.  I am also trying to write a chart for the many color combinations for the Kongo Gumi, the basic 8-strand braid.  Hopefully I will have that up in 2012.

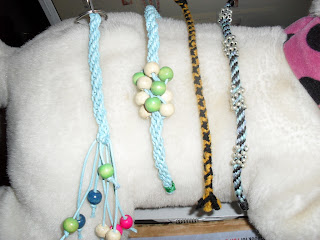
     I am putting the finishing touches on this spiral ridged set (letting the adhesive set).  The red is actually maroon 1/4" ribbon.  The yellow ridge cord was given to me by a good friend.  Her name is Debra and she is a total wiz with polymer clay.  I'm planning to have her make some pieces for some of my future braids.


     These are some slider pendants I bought from www.Mobile-Boutique.com.  You should check it out.  I will be buying from them a lot in 2012.  They have some really beautiful pieces.  And they all have double holes for creating a 2-strand piece.  They also have some beautiful clasps.  And the prices are great.  Each of these were $3.00 apiece.  Some with the same design but different color stones.


     This is what I did for my first piece using these...  Fortunately I had the green and chocolate satin cord to match the pendant. Sorry you can't really see the colors. It's really pretty. I'll be helping Santa out and getting my own digital zoom camera in January.


     Here's a piece I made using s-lon, 6/0 pink, 8/0 gold, and 11/0 green seedbeads.  I sewed the 11/0 green seedbeads on after the braid was made.  Hope you can see them.


And this was braided using Metallic and Pearlescents Effects DMC Embroidery thread.  Save those broaches and pins.  They do come in handy.  This pin came with a suit I bought for church.  I  also visit a lot of secondhand and antique shops.  You can find some really good bargains.  You can ask neighbors, friends, church members and business associates if they have any old jewelry and pins they no longer want.  If they give them to you, great.  You can offer them a monetary donation or braid them a new piece using some of their jewelry.  Either way, you come out ahead.


Well, I guess this is all for now. So with Kumihimo disk in hand, I wish you a very Merry and Blessed Christmas.  Hope to have more to show you in 2012.

Monday, December 12, 2011

Hi all,

Haven't forgotten about you.  Just busy getting more designs on paper and worked up.  So look for more pieces in the new year.

Wishing all a very Merry Christmas and a prosperous and blessed New Year!!

HO! HO! HO!
GARNIE

Monday, December 5, 2011

What A Knit Newsletter is up!

On my last post, I told you about being the featured artist for a kumihimo site newsletter.  Well, it's official...  The newsletter is up and the article looks great.  You should check it out at www.whataknit.com and look for the December 2011 issue.  You can also find it on Facebook under the same name.  I hope to have more of my work posted.  It's my favorite site for kumihimo! 

Saturday, December 3, 2011

Great Honor

Check out www.whataknit.com sometimes next week.  I am the featured artist for the month of December.  Wow!  Little ol' me...  Now I can say I'm part of the big league.  But don't worry.  I won't let it go to my head....  Just my fingers as I braid away!

Sunday, November 20, 2011

More of my Kumihimo Shopping Spree

Here are some more of my shopping spree items...


I love the books by Karen DeSousa. Especially the one in the middle and on the right of the picture.  The one in the middle has a calculation chart to help figure out how many beads you need for your project.  And the other book has instructions on how to braid the "Laramie Braid".  I've been looking for this braid for months.  The book also has a tutorial for making a peyote toggle set and end caps using delicas and #11 and #15 seed beads.  I already know how to peyote.  I just needed the pattern.

The book, "200 Braids to Loop, Knot, Weave, & Twist" by Jacqui Carey is a good book if you want to learn other methods of braiding.  But don't look for anything about using the kumi disk or plate.  This is not the book you need.  It does show how to use finger looping to make braids.  I have a cousin who tried to teach me this technique but I could never catch on.  Now that I have the book, I will be working on it.  I doubt if it will replace my love for kumihimo.

As you can see, I purchased the Bead Smith disk and plate.  They are bigger than what I'm used to working with, but I like them.  I purchased them on Ebay

So now I'm just waiting for some end clamps to get here and I will have everything.
This was a fun shopping experience that I hope will never stop.  I love Kumihimo!!!!!!


I had to share this...  As I have stated before, I attend a jewelry class at a local senior activity class every Friday morning.  This past Friday, I learned how to make a ceramic and polymer clay piece that can be used as a pin or bead.  I will be using mine on a kumihimo braid.  Now that I know how to make them, I will be making more.  I like working with these mediums also.  I think they will make interesting focal pieces along with adding more value to my pieces.

I never thought that my work was good enough for anyone but family and friends.  Well, I had to suck it up and step outside my box.  I entered 2 of my pieces in the BeadSmith Kumihimo Challenge.  For me to do that was a big step.  Even if I don't win, I feel very priviledged to have them featured on the challenge site.

This piece is made with 1mm red satin cord (bugtail) and 8mm beads.  I used the basic 8 cord movements.


This piece is made with 1mm gold satin cord (bugtail) and a novelty crochet yarn.  Again using the basic 8 cord movements.


Tuesday, November 15, 2011

My Red and Silver Necklace

This creation came about while wanting something special for Christmas.  It is a basic 8 cord pattern.  I strung beads on all 8 cords    Looking at the pattern graph in Jacqui Carey's book "Creative Kumihimo", I figured out how to space the beads so they would be strung on both sides of the braid.   For some reason, doing this flattened out this part of the braid.

8 - 1mm Red Satin Cording
8mm silver beads

Braid 1.5in without beads.
1.  Bead next L up/ R down.
2.  Braid next 8 cords without beads
3.  Repeat steps 1 & 2 for desired length
4.  Bead all 8 cords for desired length of center piece
5.  Using the bead placement of the first section of the necklace, align the "side by side" beads to    
     match sides and repeat steps 1 & 2 for length.
6.  Braid 1.5in without beads.
7.  End braid.

If you try this pattern and find mistakes or you have any questions, please leave a comment.  I plan to make another necklace and carefully write more precise instructions.

Thursday, November 10, 2011

My Kumihimo Shopping Spree

I went on an online Kumhimo shopping spree last week and purchases have been coming in almost every day this week.  I think I bought 8 books, and some other things.  Here's what I've received so far...
 Kumihimo Wire Jewelry by Giovanna Imperia - Haven't tried wire yet.  In future plans.
Creative Kumihimo by Jacqui Carey - This book has graphs that I can xerox and color.
Braiding for Beaders 2nd Edition by Anne Dilker - This book for the basic 8 cord design.  It shows color set-ups and actual braids.  It also has a tutorial for making beaded tassels.  This looks to be a good book to work with.

I won a bid on Ebay for 200 silver end clips for flat braids.  I bid $6.50.  The bonus of winning was I only had to pay $3.25, shipping included.

Finally received my satin cord I won for a penny on ebay.  The only bad thing - it took over a month to get it.   Coming from China.

I received some bobbins I bought on Amazon, 2 sizes.  I like working with the bobbins    And I received my lucet.  Gonna take a little work to get the tension correct on it.  But I will work on it.


Well, that's all for now. Will be sitting on my front steps waiting for the postman/woman to bring me more fun Kumihimo stuff.  Man, I do love Kumihimo!!!!


Saturday, November 5, 2011

Keyrings I made for a fall fair that cancelled.  I can use them for the Santa Shop at the end of the month.


Ok, my shopping spree is done for the month. At least in books (4). I ordered most of my end caps and findings. Now I just need to get some satin cording. I may just go to Hobby Lobby and get some. Will be working on a few jewelry pieces for the Santa Shop at the end of the month. Nothing fancy, just a few bracelets and necklaces. May do a little work in polymer clay for some focal pieces to go with them. A crafter's work is never done...
Hi All,
Been busy making keyrings for a fall fair that cancelled at the last minute.  But fret not, I can still use them for the Santa Shop at the senior activity center I attend.

Getting to know me, I am a firm believer of using what I have on hand until I can afford what I want.  I wanted  marudai that I could use when I'm in bed with my legs elevated.  And after much thought, this is what I came up with.  What do you think?


Thank goodness for plastic bottles!

Wednesday, October 26, 2011

The Lady at the Doctor's Office

Today I went to the doctor with my aunt and sister.  As always, my Kumihimo went with me.  A lady in a wheelchair came into the waiting room with her daughter and caregiver.  They, of course, were curious and I told them a little about what I was doing.  At some point, the receptionist called her to the desk.  When she came back to her place, she told her daughter that she wanted to sit next to me.  I showed her what I was doing and how to move the ribbons around the disk. 

Well, let me tell you, within 10 minutes, she was working the disk on her own.  She made a braid about 4" long while waiting to be called in for her appointment.  Her daughter and caregiver were amazed.  Her daughter told me that since she became ill a few months ago, she showed no interest in doing anything. 

When they left to see the doctor, I finished her braid by making it into a key fob.  I sent it into her by a nurse.  A few minutes later, the daughter came out and thanked me for giving a little life and excitement to her mom.  She also told me she was going to Hobby Lobby this week... for disks and yarn for the 3 of them.  Boy, I wish I had thought about taking pictures...  And I will hopefully see her again.  She attends the same senior activity center I attend.  God is very good at making intersections in life.

Friday, October 21, 2011

My Homemade Marudai

This is my first marudai.  It's made from a 5 gallon bucket that I bought at Home Depot.  Total cost, $7.37.  Not a bad investment.  The hardest part was cutting through the bucket.  I used an exacto knife.  My fingers were sore for a while, but it was well worth it.


My Start with Kumihimo

Hi Everybody!

I'm Garnie,  I was introduced to the art of Kumihimo in July 2011.  A friend was wearing a necklace that looked very much like bead crochet.  I had worked on bead crochet for about a year.  When she told me it was Kumihimo, I was intrigued.  I wasted no time in doing a web and Youtube search to find all I could about this newly found craft.  After doing my research and making my first bracelet  using a homemade cardboard disk and some crochet yarn, I was totally hooked and in love!

Since then I have not put my disk down.  It goes everywhere I go.  I love that convenience.  I can even take it on plane trips.  I use a pair of nail clippers to cut my cords.  Within a week of learning, I taught Kumihimo to 30 children and adults ranging in age from 8 - 80 at Vacation Bible School and my senior activity center jewelry class (the 80 year old was the pastor's mother). 

I now keep a few homemade kits with me, the cardboard disk, some crochet yarn, an easy to follow instruction sheet and my business card.  I teach the  7 cord braid with the kit.  If they show interest in want to learn more, I tell them to call me to set up an appointment.  They will purchase a form disk and the satin cord for more classes.

And that's the start of a new love in my quest for creativity.  I have used satin cord, crochet yarn, hemp, ribbon, and anything I can find to braid.  I will be posting more pictures as time goes on.  The pictures below shows some of my work and a few of the tools I used when I first started.   I hope you will enjoy my pieces and my blog.